Part 1 – Basic Project Setup and Explanation
Setup, Versions, and Requirements: Unity 5.6.0f3 and a model with a high poly-count.
Target Audience
This series is aimed at Unity developers with little to no shader experience, although basic knowledge of Unity project structure and C# is expected. If you’re feeling a little rusty, the official Unity Tutorials are a great place to start.
This is article one in our multi-part series on developing a custom shader for Unity. In this article we will be setting up the basic project structure we will use throughout the rest of the article series.
The shader we’ll be creating will only support models with a high polygon count. This is because we’re going to be trying to show a smooth sine wave along the surface of the model and if the poly count is too low it will just appear choppy and broken. In the future, we may extend this shader to add geometry dynamically, but for the sake of simplicity we’re only going to support high poly models for now.
If you’re in need of a high poly model, I’ve included one in the example project available on the asset store.
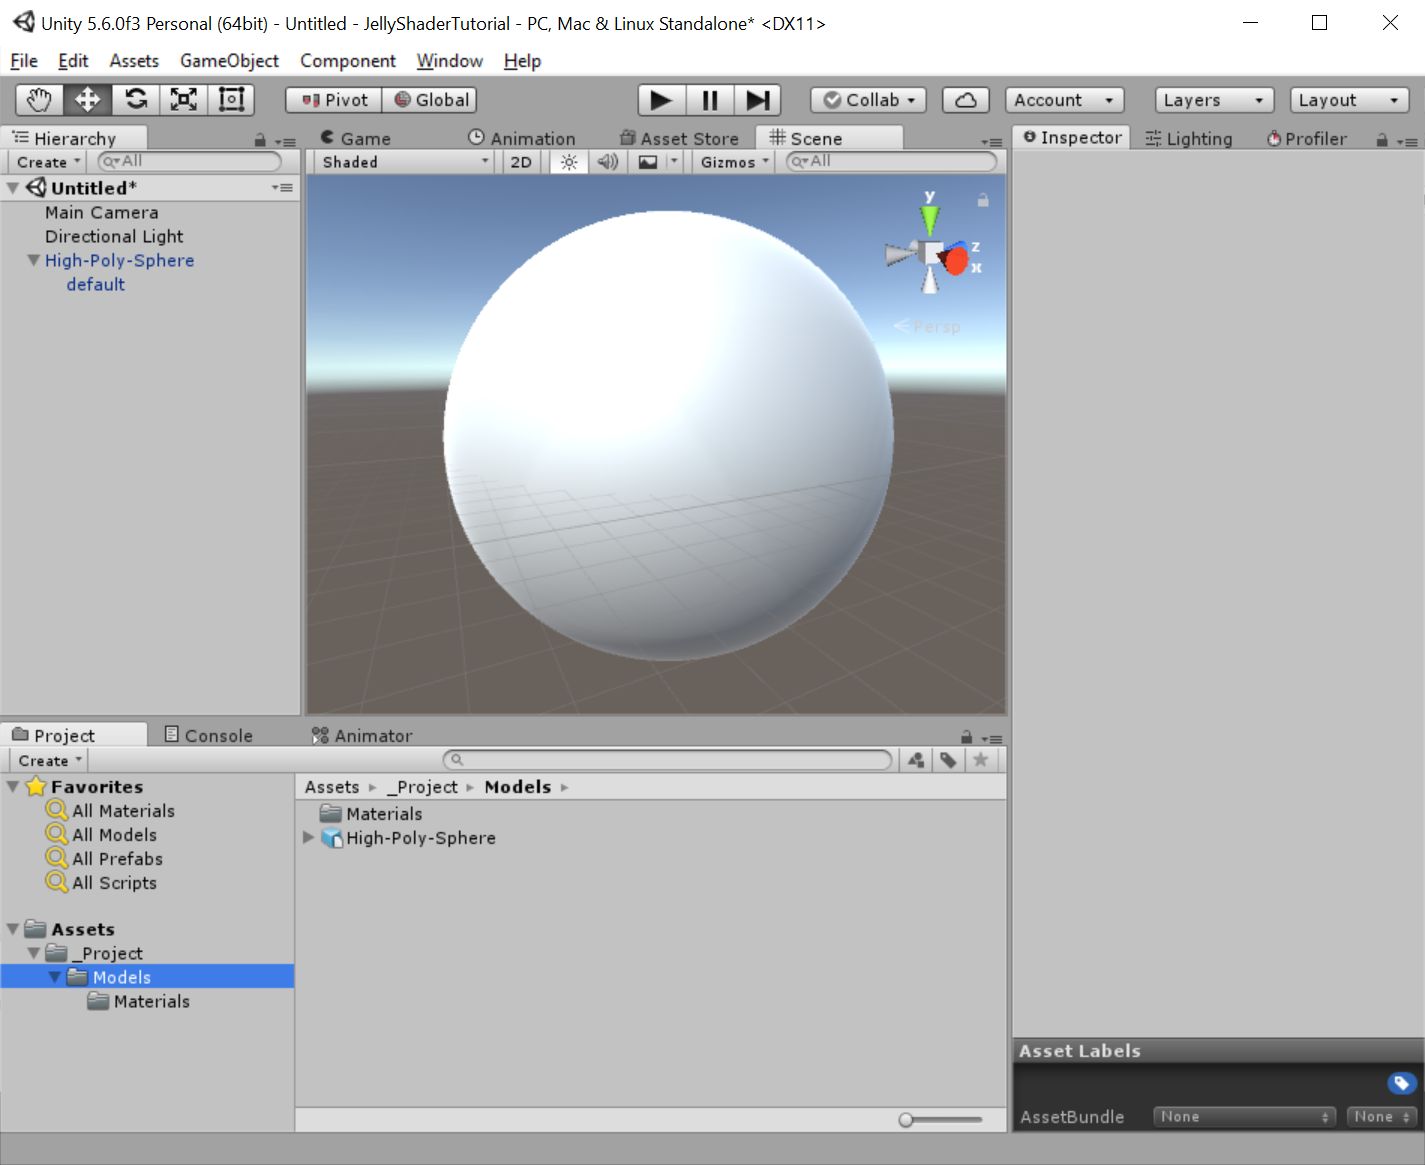
First things first, once you’ve found a suitably high poly model, drag it into your scene. Your basic project should look something like this:

Next, we need to create a new shader to work with. Right click in the project window and select Create -> Shader -> Standard Surface Shader. Name the new shader “JellyShader.” We now have a basic Unity surface shader. Now let’s create a material that utilizes this shader. Right click JellyShader and select Create -> Material. Rename the new material “JellyMaterial.” This process creates a material that is already assigned to the “JellyShader” shader.
Materials and Shaders
If you’re familiar with object-oriented programming concepts, you can think of a Material as an instance of a shader. Many materials can be assigned to a single shader, each one with slightly different attributes.
GLSL, CG, and ShaderLab Files
Shaders can be written in several different, but very similar, languages. Including GLSL, HLSL, and CG. Unity itself uses something called ShaderLab. ShaderLab is an abstraction one level above GLSL or CG that tells Unity how to render a mesh. This ShaderLab file also contains the actual GLSL or CG shader code we’re writing to render our jelly effect.
Unity Surface Shaders
When we created our shader, we selected “Standard Surface Shader.” This auto-generated a shader that includes everything the shader needs to use Unity’s built-in lighting effects. This saves us a lot of time and is a great place to start when you’re first learning shaders. More information on Surface Shaders is available on Unity’s Shader Reference and Writing Shaders documentation pages.
Now that we have our material, our last bit of setup is to drag and drop our JellyMaterial onto our sphere. Let’s verify that the shader is attached to our model. In the Hierarchy tab, select your model. At the bottom of the Inspector tab, under Mesh Renderer, it should say “Shader: Custom/JellyShader.” If you don’t see a Mesh Renderer in the inspector tab, you may need to drill down into the children of your model in the Hierarchy tab. For example, if you’re using the model I supplied, the object you’re looking for is “default” which is a child of “High-Poly-Sphere.”
Once you have found your shader on your model, expand out the shader section. Because we used “Standard Surface Shader” there should already be a number of options built into our shader including, Color, Albedo, Smoothness, and Metallic.
Physically Based Rendering
Unity’s Standard Surface Shader uses Physically Based Rendering (PBR.) As usual, consult Unity’s official documentation for a great breakdown on working with PBR.
Feel free to play around here with the material’s color, smoothness, and metallic. I’ve changed my sphere to a soft blue. Now it’s time to actually start writing our shader. Double click JellyShader. It should launch into Visual Studio or Mono. Let’s do a quick breakdown of everything included in this default shader.
Properties {

_Color (“Color”, Color) = (1,1,1,1)

_MainTex (“Albedo (RGB)”, 2D) = “white” {}

_Glossiness (“Smoothness”, Range(0,1)) = 0.5

_Metallic (“Metallic”, Range(0,1)) = 0.0

}
This first section is listing of variables that should be exposed to the Unity Editor as well as their default values. To actually access these values inside of your shader code, you’ll have to declare variables with the exact same name and the corresponding variable type inside the SubShader portion of the shader file.
ShaderLab Property Types
Property Type Variable Type Special Notes Color fixed4 Vector float4 Range(0,1) float Editor shows a slider with the given range Float float int int Texture2D sampler2D Editor shows a texture picker. Texture3D sampler3D Editor shows a texture picker. CUBE samplerCUBE
SubShader {

Tags { "RenderType"="Opaque" }

LOD 200

CGPROGRAM

// Physically based Standard lighting model, and enable shadows on all light types

#pragma surface surf Standard fullforwardshadows

// Use shader model 3.0 target, to get nicer looking lighting

#pragma target 3.0
We’re going to gloss over most of this section. For our shader, we can leave all of this as is.
A Gentle Introduction
If you’d like a more thorough explanation of these tags and compiler directives, or just want a better understanding of how shaders function inside Unity, I highly recommend reading Alan Zucconi’s amazing series, A Gentle Introduction to Shaders in Unity 3D.
sampler2D _MainTex;
struct Input {

float2 uv_MainTex;

};
half _Glossiness;

half _Metallic;

fixed4 _Color;
_MainTex, _Glossiness, _Metallic, and _Color, are some of the variables we’ll be using in the creation of our shader. Notice that these are named exactly the same as their Property counterparts. In order to use a variable from the editor, it needs to be exposed in the property section and declared in the body of the shader.
// Add instancing support for this shader. You need to check 'Enable Instancing' on materials that use the shader.

// See https://docs.unity3d.com/Manual/GPUInstancing.html for more information about instancing.

// #pragma instancing_options assumeuniformscaling

UNITY_INSTANCING_CBUFFER_START(Props)

// put more per-instance properties here

UNITY_INSTANCING_CBUFFER_END
This is another section we’re going to pass on for now. Unity 5.6 added a feature called instancing to it’s shaders. You can read about it here.
void surf (Input IN, inout SurfaceOutputStandard o) {

// Albedo comes from a texture tinted by color

fixed4 c = tex2D (_MainTex, IN.uv_MainTex) * _Color;

o.Albedo = c.rgb;

// Metallic and smoothness come from slider variables

o.Metallic = _Metallic;

o.Smoothness = _Glossiness;

o.Alpha = c.a;

}
Now we’re getting to the good stuff! This section is our surface shader. This code will be run on every pixel in our scene. The first thing to note is SurfaceOutputStandard. Unity has several built in structures for surface function output, including SurfaceOutput, SurfaceOutputStandard, SurfaceOutputStandardSpecular.
ShaderLab Output Structures
struct SurfaceOutput

{

fixed3 Albedo;  // diffuse color

fixed3 Normal;  // tangent space normal, if written

fixed3 Emission;

half Specular;  // specular power in 0..1 range

fixed Gloss;    // specular intensity

fixed Alpha;    // alpha for transparencies

};
[xt_empty_space gap=”30″]
struct SurfaceOutputStandard;
{
fixed3 Albedo; // base (diffuse or specular) color
fixed3 Normal; // tangent space normal, if written
half3 Emission;
half Metallic; // 0=non-metal, 1=metal
half Smoothness; // 0=rough, 1=smooth
half Occlusion; // occlusion (default 1)
fixed Alpha; // alpha for transparencies
}
[xt_empty_space gap=”30″]
struct SurfaceOutputStandardSpecular

{

fixed3 Albedo;      // diffuse color

fixed3 Specular;    // specular color

fixed3 Normal;      // tangent space normal, if written

half3 Emission;

half Smoothness;    // 0=rough, 1=smooth

half Occlusion;     // occlusion (default 1)

fixed Alpha;        // alpha for transparencies

};
The next line `fixed4 c = tex2D (_MainTex, IN.uv_MainTex) * _Color;` Uses the tex2D function to grab the color for this particular pixel from the texture supplied by _MainTex and tints it with the color supplied by _Color. The final step is to fill out the SurfaceOutputStandard object o with our final values.
That gives us the basic breakdown of the surface shader Unity created for us. In the next part we will actually start modifying the shader.
